4. Labyrinths of roma style
The roma labyrinth is simple and interesting and beautiful and
can be used in many cases like for squares of flagstones and floors of mosaic.
The name roma (for
Section 3A shows a broad view of non-Piadena Roman labyrinths.
The main
principle for square and circular roma labyrinths:
- the labyrinth is distinctly
divided into 4 quadrants with 4 radial lanes in the 4 quadrant lines
- quadrant 2 and 3 is a precise
repetition of quadrant 1
- quadrant 4 is either = quadrant
1 or a necessary variation that apparently is similar
4 similar
quadrants will have the entrance as well as the exit at the outer edge of the
labyrinth.
When the
labyrinth has the final goal in the centre the 4’ quadrant must be different
and “turn” the wavy outward movement inward towards the centre.
- We have seen by the analysis of
the real Roma-Piadena Labyrinth that the lane
pattern in each quadrant was according to a wave pattern and that the
outer edge of the quadrant was an unbroken lane, see fig. r2 detail A.
These principles
are used to design a system of roma quadrants for
quadrant 1 in fig. r2 and
for quadrant 4 in fig. r3 and fig. r4 according to the wave forms shown
in fig.
r1.
Entrance at the top
The
labyrinths here are orientated in the same way as the real Roma-Piadena Labyrint is pictured, i.e. with the entrance at the top on the drawing, and when
entering quadrant 1 is on the right hand and quadrant 4 on the left hand (so
counter clockwise cirkulation). (Section 3A shows
other slightly different types of Roman labyrinths).
Entrance as well as exit at the
outer edge
As shown in
some examples the roma labyrinth can, besides having
the goal in the centre like troja and
Unit for length
and area is 1 check, e.g. 1 x 1 meter, 1 = total lane width, or the distance
from lane centre line to lane centre line.
Labyrinth symbols used on this
website
Su11-1rp5-1
means: S = Square, u = outside exit, 11 = 11 big cross section,
1 = 1 big centre space, rp = roma(-piadena)
model, 5 = 5 oscillations in the wave, 1 = number.
Ci18-2ch: C
= Circle, i
= internal goal (lane finish), ch =
Ri14/15-1tr:
R14/15 = Rectangle 14 x 15, tr = troja.
Fig. r3: Quadrant 4 complying wiht H
Fig. r4: Quadrant 4 complying with K
Fig.
r15:Form AABA Si9-1, Si17-1
Fig. r16: Various roma labyrinths
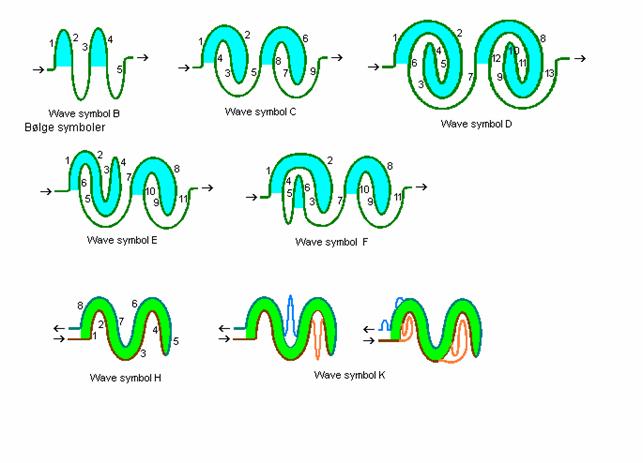
Fig. r1: Wave symbols
Basic wave
symbols for labyrinths.
In the
Roma-Piadena Labyrinth the lane pattern of each
quadrant is a wave figure. In the troja labyrinths
the lane pattern of the whole labyrinth is a wave figure. The shown wave
figures will be used here.
Symbol B: ”the basic wave”.
Appears in troja 1 with wave part 1 – 3.
Symbol C: ”wave breaking from crest”.
Appears in troja 2 with wave part 2 – 8. Appears in Roma-Piadena quadrant 1 – 3
moving from 9 to 1.
Symbol D: ”rolling breaking”.
Appears in troja 3 with wave part 2 – 12.
Symbol E: ”bounced breaking”.
Symbol F: ”leaping breaking”.
Symbol H: ”snake wave”.
Appears in Roma-Piadena quadrant 4.
Symbol K: ”snake wave with loose skin”.
The shown
“wrinkles” on the ”snake skin” on the lane inwards and outwards will appear
more or less in the roma labyrinths shown here.
In the
following there are labyrinth examples of all the types of wave symbols here.
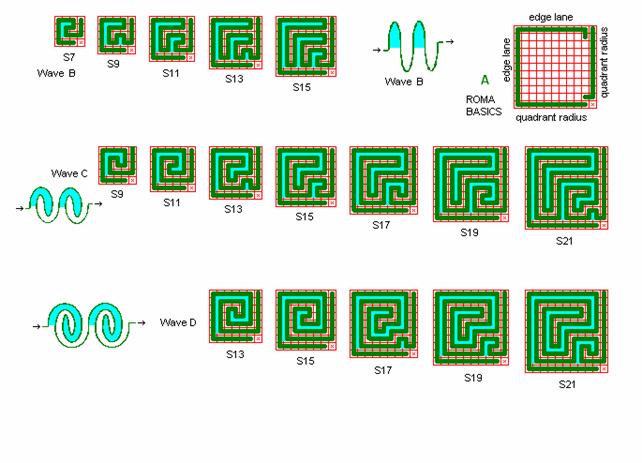
Fig. r2: Quadrant 1
Elementary roma quadrants complying with wave B, C, and D for quadrant
1 – 3 in roma labyrinths.
Quadrant 1
is shown here, with the centre of the labyrinth in the lower right corner.
For a
labyrinth there can be used 4 identical quadrants, e.g. S11 turned 0°, 90°,
180°, 270°, placed around the joint centre. The labyrinth will then be 11 x 11 square big and has both the entrance and exit at the outer
edge, Su11, se Su11-1rp5-1 in fig. r16 in this roma
section. If a special quadrant 4 from the following 2 figures is used the
labyrinth has its goal in the centre, Si11.
The
quadrants are designed using the 3 basic wave forms B, C, and D, and using the
basic roma-piadena principles shown in detail A. The
smallest quadrant included here is S7 with 1 wave B. S15 has 3 waves B, or 1½
wave C, or 1 wave D. Bigger quadrants are constructed in the same way. The real
Roma-Piadena Labyrint uses S21 wave C with 4 checks from
the quadrant used for the centre square (which in total is 3 x 3 checks).
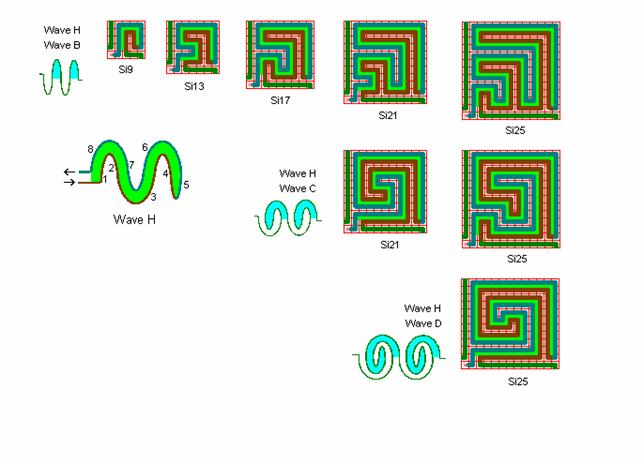
Fig. r3: Quadrant 4 complying with wave H
Elementary roma quadrants for quadrant 4 in roma labyrinth with its goal in the centre.
Wave form
H, "the snake wave” is used, i.e. walking outwards and inwards along the
same route, where then the snake is waving according to wave form B or C or D.
As a double
line (lane) is needed (both outwards and inwards lane) there is a need of more
area, so that not so many proposals for quadrants are obtained. So it can be
relevant to depart from the double line and change to wave form K in fig. r4 below, as shown in the examples, also with the
intension of getting more beautiful solutions for the roma
labyrinth.
Compare
Si21 wave B to the Roma-Piadena in detail F in fig.
Rp2 mirrored diagonally.
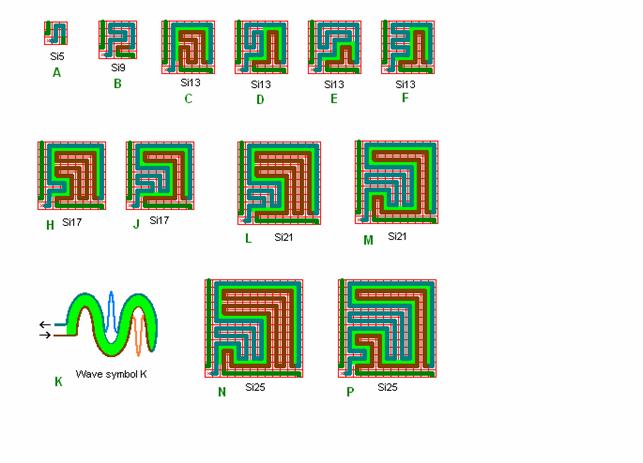
Fig. r4: Quadrant 4 complying with wave K
Elementary roma quadrants for quadrant 4 in roma labyrinths with its goal in the centre.
Wave form K
is used, i.e. there are deviations from the double line in the snake wave H in
the preceding figure, fig. r5.
Wave K
shown in detail K with the shown 2 minor waves are both used in L and N and
with one minor wave in C, D, H , J, M, and P. There
are more variants as here shown for Si13 in E and F.
More
adjustment variations are shown in other figures with labyrinths (e.g. fig. r11).
4
variations of Si13 are shown here, but by making only small changes in e.g.
detail C several more proposals can be obtained, which then like in detail F
will deviate a little from the regular wave form.
The small
Si5 in detail A is without a radial lane in quadrant 4.
Si9 is also
a double line snake wave in a mirrored form compared to Si9 in fig. r3.
3+1 quadrants = labyrinth
Quadrants from the 3 figures with elementary quadrants (fig. r2 + r3, or r2 + r4) can
then be combined to complete labyrinths.
To get a
beautiful impression of quadrant 4 together with the other quadrants the
quadrants should be selected with care and small changes in the lane trace
should be tried, as it is seen in the shown examples in the following figures
(see e.g. fig. r9 together with r10,
and r11).
4 total
different quadrants can also be combined to a labyrinth, a more different
labyrinth to walk, but then it is not roma style as
defined in this section. (A possible mistaken exception is the Wales roma-Labyrinth
in fig. ra14 in section 3A).
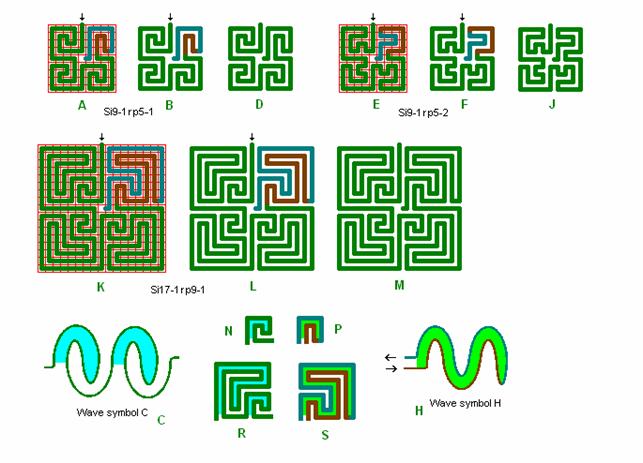
Fig. r5: Si9-1 and Si17-1
Roma
labyrinths size 9 square and 17 square are combined by the elementary quadrants
from the above fig. r2 and r3.
Si9 in A,
B, and C and Si17 have the wave form C, and in quadrant 4 wave
form H.
Si9 in E, F,
and J has wave form B and H, see also Si9-3 in fig. r7
below with the wave form.
By viewing
the labyrinths artistically in detail D, J and M it can then be evaluated how
well quadrant 4 fits in with the other quadrants in a quick glance.
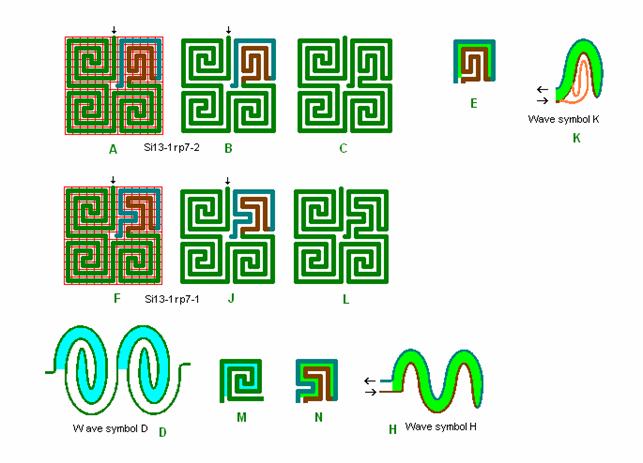
Fig. r6: Si13-1
Roma
labyrinth size 13 square with wave form D and H, and
wave form D and K.
The
labyrinth in detail F, Si13-1rp7-1, is made by elementary quadrants from fig. r2 and r3 with wave form H.
The slightly
different labyrinth above in detail A, Si13-1rp7-2, is
made by elementary quadrants from fig. r2 and r4 with wave form K, where wave form K in detail K has a
small deviation from the double line of wave form H to change quadrant 4 a
little in detail E. I find this a more beautiful roma
labyrinth with better conformity and symmetry from quadrant 1 to quadrant 4.
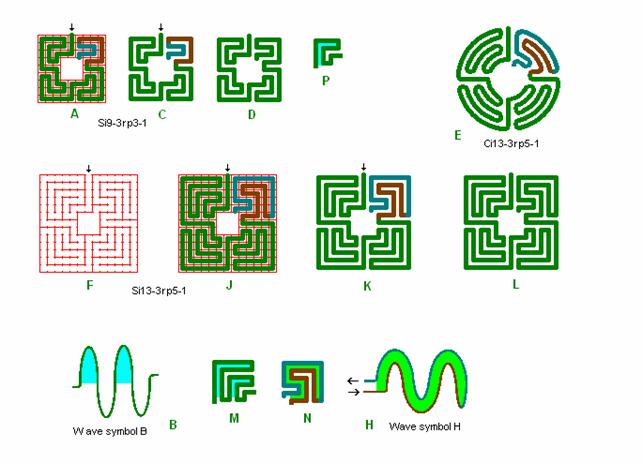
Fig. r7: Si9-3 and Si13-3
Roma labyrinth
size 9 and 13 square with wave form B and H and with a centre square.
Si 9 and
13 square with wave form B and C can easily have those checks in the centre
removed, while this is not so easy for wave form D used in the preceding figure
(fig.
r6).
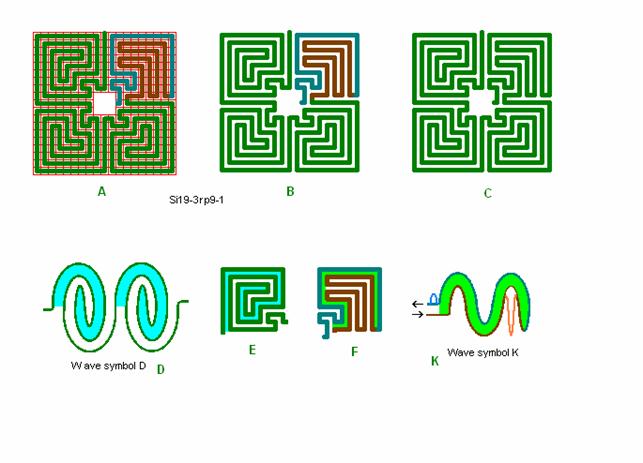
Fig. r8: Si19-3
Roma
labyrinth size 19 square with waveform D and K and
with centre square 3 x 3.
19 is not
the most simple standard size for quadrant 4, and wave
D is not the most simple form for cutting out a centre square, but it is done
here with some small moving of the exit to the centre goal.
It is seen
that it is rather simple to cut out a centre square of 5 x 5 size,
for Si19-5rp.
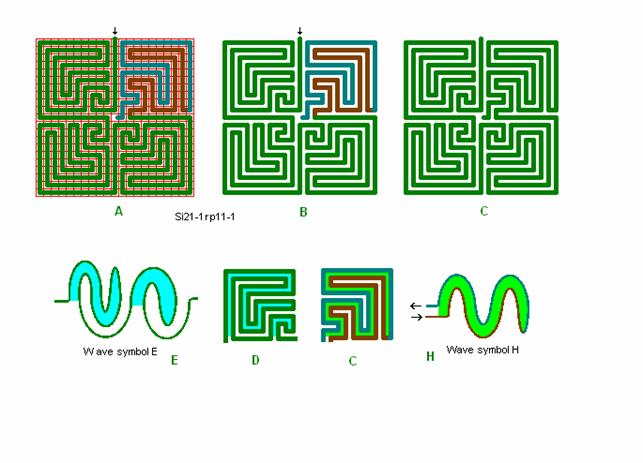
Fig. r9: Si21-1, -1
Roma
labyrinth size 21 square with wave form E and H.
If a centre
square of 3 x 3 is wanted it can be obtained with a very small change of the
lane trace in quadrant 1 – 3 as shown above for Si13-3rp5-1 in fig.
r7, or as shown by the real Roma-Piadena
Labyrint Si21-3rp9-1.
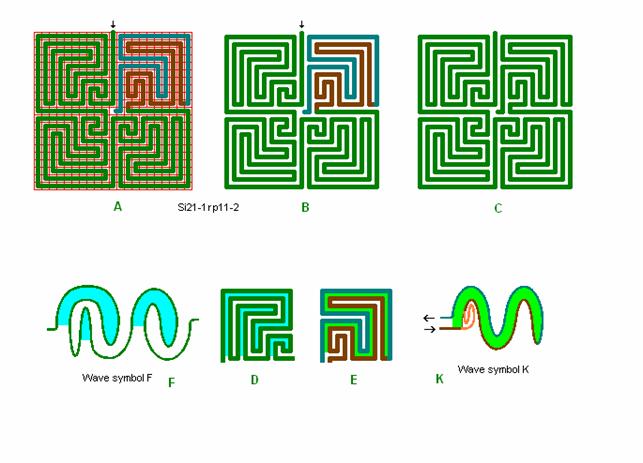
Fig. r10: Si21-1, -2
Roma
labyrinth size 21 square with wave form F and K.
A centre
square of 3 x 3 can be obtained like in the preceding figure (fig. r9) e.g. to
be compared with the real Roma-Piadena
Labyrinth Si21-3rp9-1.
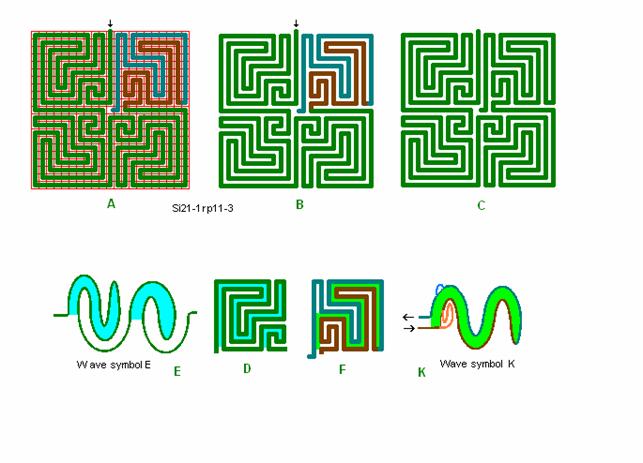
Fig. r11: Si21-1, -3
Roma
labyrinth size 21 square with wave form E and K.
The
labyrinth does not have a continues edge lane, as the upwards orientated tip of
the tong in detail E “breaks through”, so here it does not completely fulfil
our roma principle (roma-piadena
principle). It can though easy be corrected by withdrawing the tip of the tong
a little. But otherwise this is just an example of a different labyrinth.
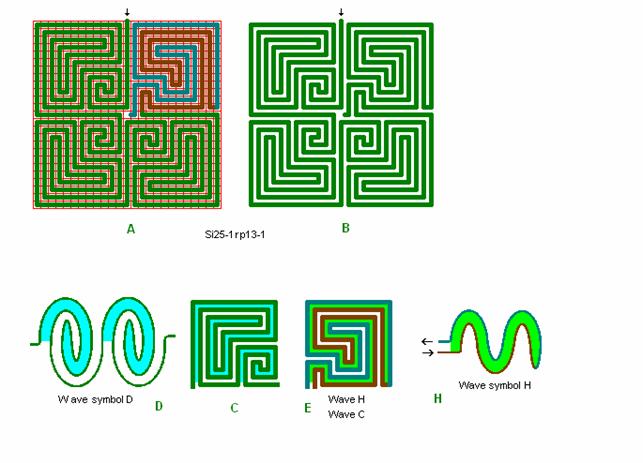
Fig. r12: Si25-1, -1
Roma
labyrinth size 25 square with wave form D and with
wave form H and C in square 4.
See the
next figure (fig. r13)
with a changed (and more beautiful) quadrant 4.
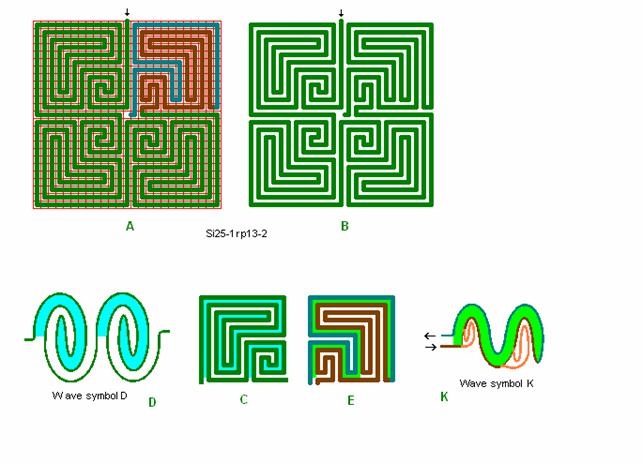
Fig. r13: Si25-1, -2
Roma
labyrinth size 25 square with wave form D and K.
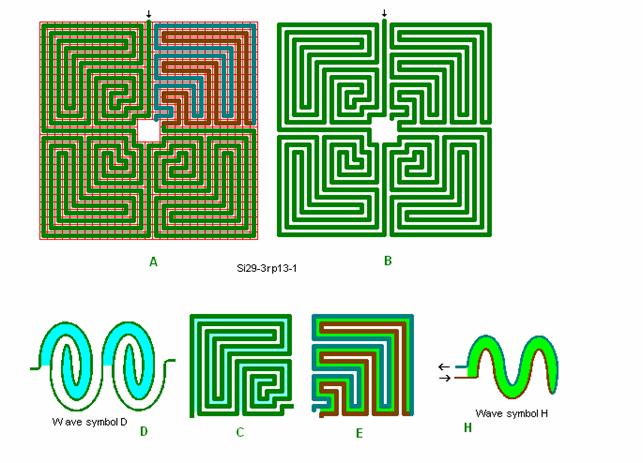
Fig. r14: Si29-3
Roma labyrinth size 29 square with wave form D and H and with a centre
square.
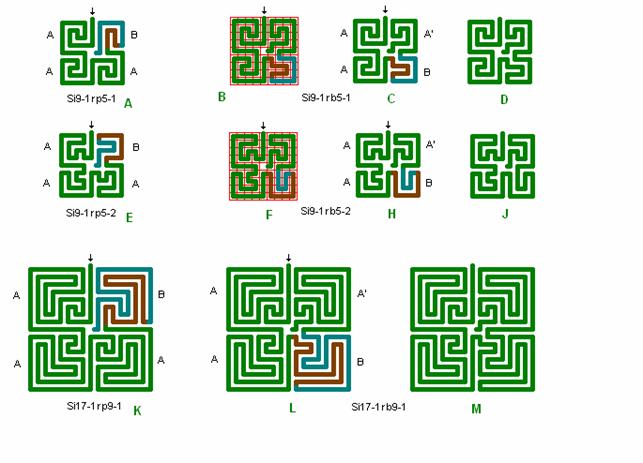
Fig. r15:Form AABA
Si9-1, Si17-1
Roma
labyrinths traversing the 4 quadrants according to the form A,A,B,A’.
In music
the form AABA is often used. Roma labyrinths have the form AAAB. Here there is
shown examples of changing the form AAAB to AABA’ for 3 roma
labyrinths. A’ is A mirrored and A’ is traversed, walked, in the opposite
direction of A, as the direction is turned in B. See also fig. Rp3.
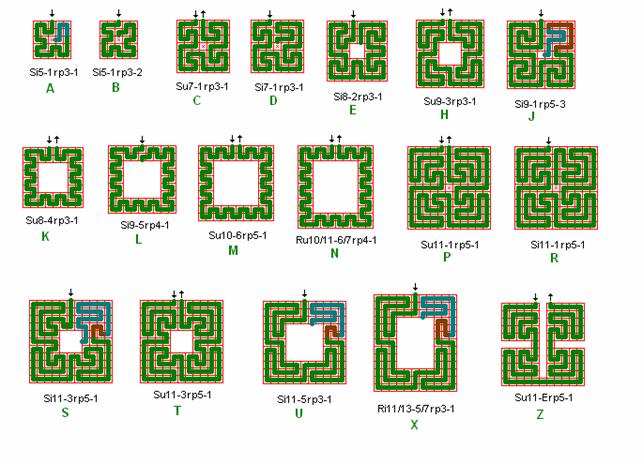
Fig. r16: Various roma
labyrinths.
Besides the
labyrinths we have studied above a lot more can be designed that more or less
complies with the roma principles. In this figure a
few are shown and some of them are commented here.
Si5 in A
does not have a quadrant lane in quadrant 4.
Si7 in D is
missing a quadrant line.
K, L, M, N show a 2 wide edge border and this is too narrow for the roma principle.
H, U, X
show a 3 wide edge border and then the roma principle
can be included. H, U, X can easily be extended to other sizes of squares and
rectangles with a 3 wide edge border. This is done for U as the roma segment labyrinth in the big combined labyrinth in fig. ph1, and equivalent for S in fig. ph2.
Su11 in Z
is only included to indicate how to proceed to expand the labyrinths to include
parts with e.g. plants, sandboxes etc.
A lot more suggestions
to labyrinths can be drawn, so often it is possible to find a solution for the
given conditions.
Contents of the other
sections:
5 Chartres Labyrinth in Chartres
6 Labyrinths
of chartres style
7 Comparing
labyrinth-examples